
14 KiB
- 1. Reference
- 1.1. Next.js Authentication Made Easy with Microsoft Entra ID
- 1.2. Next.js 16 Middleware DEPRECATED - Authentication In Proxy Or Data Access Layer?
- 1.3. Overview of user consent and how to manage it in Microsoft Entra | Microsoft
- 1.4. Add Tailwind CSS to an Existing Next js Project
- 1.5. How to style Material UI component with Tailwindcss in React project
- 1.6. How to Use Prisma 7 in Next.js
- 2. Project Structure
- 3. App Registrations
- 4. Steps
- 5. .env files
- 6. Prisma Install
- 7. Run this whenever you change your schema.prisma file
- 8. Where we are up to 8/1/2026
- 9. Testing Creating And Uploading Folders and Files
1. Reference
1.1. Next.js Authentication Made Easy with Microsoft Entra ID
Next.js Authentication Made Easy with Microsoft Entra ID
1.2. Next.js 16 Middleware DEPRECATED - Authentication In Proxy Or Data Access Layer?
Next.js 16 Middleware DEPRECATED - Authentication In Proxy Or Data Access Layer?
1.3. Overview of user consent and how to manage it in Microsoft Entra | Microsoft
Overview of user consent and how to manage it in Microsoft Entra | Microsoft
1.4. Add Tailwind CSS to an Existing Next js Project
Add Tailwind CSS to an Existing Next js Project
1.5. How to style Material UI component with Tailwindcss in React project
How to style Material UI component with Tailwindcss in React project
1.6. How to Use Prisma 7 in Next.js
How to Use Prisma 7 in Next.js
2. Project Structure
The following is the desire structure
web-calibre/
├── src/
│   ├── app/                # All Routes (Pages & APIs)
│   │   ├── api/            # API ROUTES
│   │   │   ├── auth/       # NextAuth routes [...nextauth]
│   │   │   └── upload/     # Custom API for OneDrive sessions
│   │   ├── dashboard/      # Protected user area
│   │   ├── layout.tsx      # Global Layout
│   │   └── page.tsx        # Landing Page
│   ├── components/         # MUI Components (FileTable, Navbar)
│   ├── lib/                # Config (Prisma, Theme, Auth)
│   │   ├── prisma.ts
│   │   └── theme.ts        <-- MUI Theme Defined Here
│   └── middleware.ts       <-- Protected Routes Logic
├── prisma/                 # DB Schema
└── .env                    # Secrets
3. App Registrations
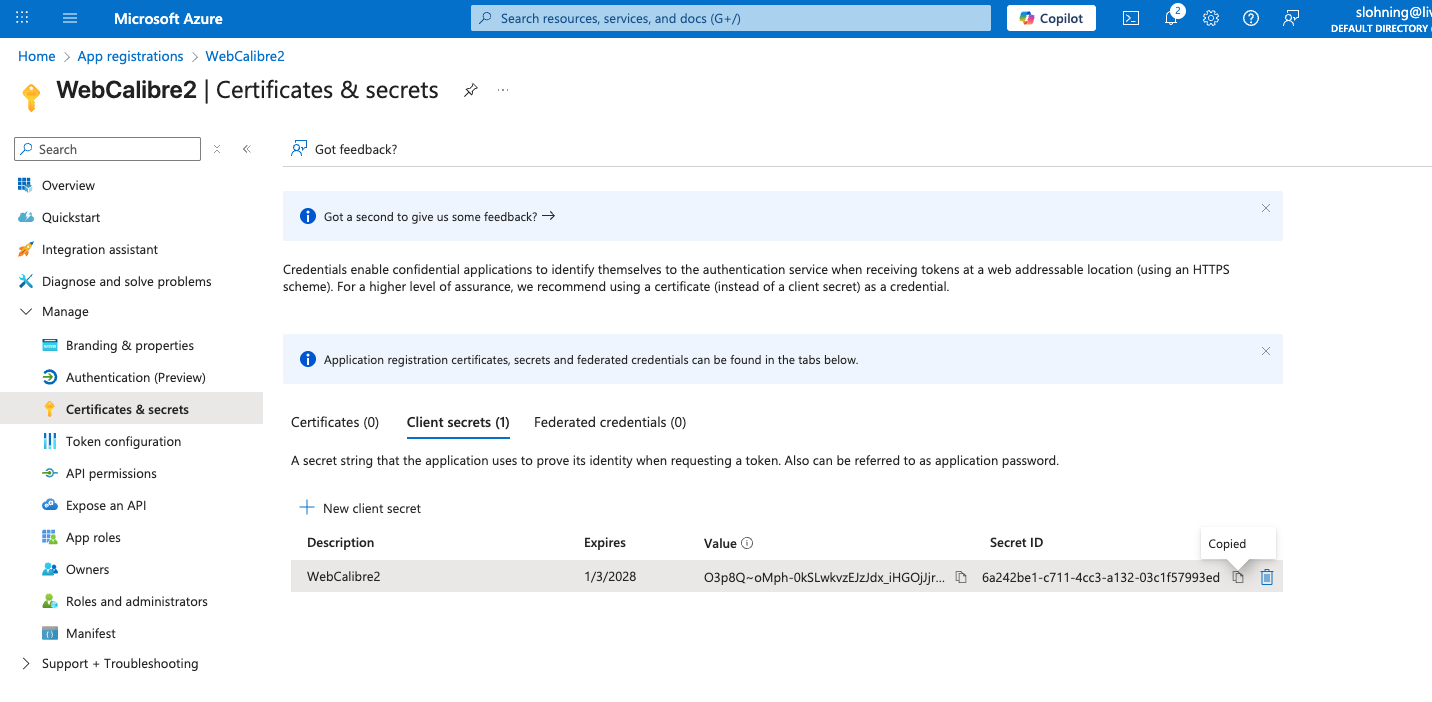
WebCalibre2 Application (client) ID = 'b549931a-f491-436b-b7bc-d37d8ca3c17e'
Object ID ='0b8256a2-e2ac-472b-896a-4b5845bc32fe'
Directory (tenant) ID = '1c06ce7c-7884-4796-8652-d4c32d75a5d0'
Expires = 1/3/2028
Value='O3p8Q~oMph-0kSLwkvzEJzJdx_iHGOjJjrr5Pa1A'
Secret ID='6a242be1-c711-4cc3-a132-03c1f57993ed'
Since you are using NextAuth.js, the URL must follow a very specific pattern.
For local development: http://localhost:3000/api/auth/callback/azure-ad
For production: https://your-domain.com/api/auth/callback/azure-ad
Note: Replace azure-ad with whatever ID you give the provider in your code. By default, in NextAuth, it is usually azure-ad.
WebCalibre3
| Display name | WebCalibre3 |
|---|---|
| Application (client) ID | a95ef644-cb9d-465c-8dae-f822a78a8ac3 |
| Object ID | 1e1f2bda-661c-4ad0-9aae-82313c603076 |
| Directory (tenant) ID. | 1c06ce7c-7884-4796-8652-d4c32d75a5d0 |
Client credentials
| Description | Expires | Value | Secret ID |
|---|---|---|---|
| WebCalibre3 | 1/5/2028 | VZ48Q~EOsgZcgBI25cc0zys.h9zM7hN9I7DhZdnW | d647cf28-80ed-45fb-a89e-e2bc323a40e9 |
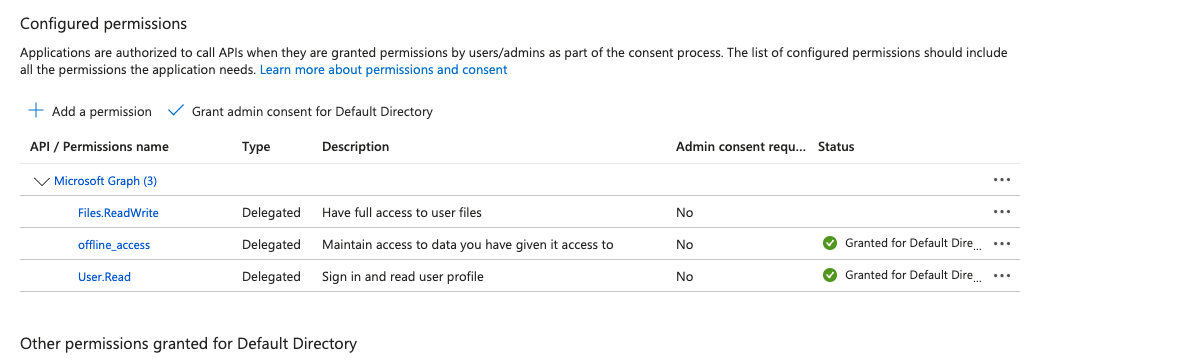
3.1. Permissions Needed
4. Steps
4.1. create nextjs app
The following command creates the nextjs folder structure
Yes, Next.js has a specific syntax to create a project in your current directory instead of creating a new subfolder.
To do this, navigate to your empty project folder in the terminal and run:
npx create-next-app@latest .
Important Details:
-
The Dot (.): This tells the installer to use the current directory as the project root.
-
Naming Conflict: If the folder name contains capital letters (e.g., WebCalibre), the command will fail with an error. Next.js requires the root folder name to be all lowercase and URL-friendly. You must rename your folder to web-calibre before running the command. This caused me rename to all lower case.
3.Empty Folder: The directory must be empty (except for hidden files like .git). If you already have files in there, the installer will stop to prevent overwriting your work.
What happens next? Even though you are using the current directory, the interactive prompt will still ask you:
"What is your project named?" You can just hit Enter to accept the current folder name.
Configuration: It will then ask you about TypeScript, ESLint, Tailwind CSS, the src/ directory, and the App Router.
Based on our previous discussions, I recommend selecting "Yes" for TypeScript, ESLint, Tailwind, the src/ directory, and the App Router to match the professional structure we planned for WebCalibre.
4.2. Create .env file
In Next.js, the distinction between .env and .env.local is primarily about security and overriding defaults. While both store key-value pairs, they are handled differently by Git and the Next.js runtime.
- Security & Version Control (Git)The most important reason is that .env.local is automatically ignored by Git in standard Next.js projects.
- .env: Intended for "safe" default values that you want to share with your entire team. It is committed to your repository so that every developer has the same baseline configuration.
- .env.local: Intended for secrets (API keys, database passwords, Azure secrets). Because it is not committed to Git, your private credentials never end up on GitHub or in your production code history.
- Priority & Overriding Next.js uses a "hierarchy" of loading.1 If you define the same variable in both files, .env.local wins. This allows you to set a generic placeholder in .env for the team, but use your specific local developer settings on your own machine. For example:
- In .env: DATABASE_URL=postgres://localhost:5432/mydb (The team's default)
- In .env.local: DATABASE_URL=postgres://admin:password123@localhost:5432/my_private_dev_db (Your personal setup)
The Next.js Loading Order Next.js looks for variables in this specific order (from highest priority to lowest):
- process.env (System environment variables)
- .env.development.local (Only during npm run dev)
- .env.local (Available in all environments except test)
- .env.development
- .env (The final fallback)
DATABASE_URL="postgresql://stephen:Web2025$$@192.168.1.210:5432/webcalibre2"

# Credentials for your Microsoft App (NextAuth)
AZURE_AD_CLIENT_ID="549931a-f491-436b-b7bc-d37d8ca3c17e"
AZURE_AD_CLIENT_SECRET="6a242be1-c711-4cc3-a132-03c1f57993ed"
AZURE_AD_TENANT_ID="1c06ce7c-7884-4796-8652-d4c32d75a5d0"
Summary Comparison Table
| Feature | .env | .env.local |
|---|---|---|
| Purpose | Shared defaults/constants | Private secrets & local overrides |
| Committed to Git? | Yes | No (Added to .gitignore) |
| Sensitive Data? | NEVER | YES (API Keys, Secrets) |
| Scope | All developers/environments | Just your machine |
**Best Practice Tip: ** Since .env.local isn't shared on GitHub, it’s a good idea to create a file named .env.example in your project. This file should contain the names of the keys (e.g., AZURE_AD_CLIENT_SECRET=) but leave the values blank, so other developers know which variables they need to create on their own machines.
4.3. Configure Git
Nextjs initializes git by default. But is doesn't add some configs that I do
git config --global push.followTags true
git remote add origin "/Users/stephenlohning/Library/CloudStorage/OneDrive-Personal/Documents/10_GIT_Repositories/124_WebCalibre2.git"
git remote -v origin /Users/stephenlohning/Library/CloudStorage/OneDrive-Personal/Documents/10_GIT_Repositories/124_WebCalibre2.git (fetch) origin /Users/stephenlohning/Library/CloudStorage/OneDrive-Personal/Documents/10_GIT_Repositories/124_WebCalibre2.git (push)
4.4. Test nextjs
npm run dev

> 124_webcalibre2@0.1.0 dev
> next dev

▲ Next.js 16.1.1 (Turbopack)
- Local:         http://localhost:3000
- Network:       http://192.168.1.100:3000
- Environments: .env

✓ Starting...
✓ Ready in 648ms
If it working proceed
4.5. Check Authentication
I ran through the Video:-
Next.js Authentication Made Easy with Microsoft Entra ID
4.6. Install NextAuth.js v5
npm install next-auth@beta
Setup Environment The only environment variable that is mandatory is the AUTH_SECRET. This is a random value used by the library to encrypt tokens and email verification hashes. (See Deployment to learn more). You can generate one via the official Auth.js CLI running:
npx auth secret
created .env.local
AUTH_SECRET="7cz3Z4kUI2kB3mdAPo58iioUDLSRJ92X8+boEixvO8k=" # Added by `npx auth`. Read more: https://cli.authjs.dev
5. .env files
5.1. .env.local
# values generated by Gemini
# Generated for security
AUTH_SECRET="7cz3Z4kUI2kB3mdAPo58iioUDLSRJ92X8+boEixvO8k="

# Use 'common' for multi-tenant (Work + Personal) support
AUTH_MICROSOFT_ENTRA_ID_TENANT_ID="common"

# The Application (client) ID
AUTH_MICROSOFT_ENTRA_ID_ID="b549931a-f491-436b-b7bc-d37d8ca3c17e"

# The Client Secret VALUE (ensure no leading '6' or spaces)
AUTH_MICROSOFT_ENTRA_ID_SECRET="O3p8Q~oMph-0kSLwkvzEJzJdx_iHGOjJjrr5Pa1A"

# Required to tell Auth.js to trust your localhost/proxy URL
AUTH_TRUST_HOST=true
5.2. .env
DATABASE_URL="postgresql://stephen:Web2025$$@192.168.1.210:5432/webcalibre2"

# Credentials for your Microsoft App (NextAuth)
AZURE_AD_CLIENT_ID="549931a-f491-436b-b7bc-d37d8ca3c17e"
AZURE_AD_CLIENT_SECRET="6a242be1-c711-4cc3-a132-03c1f57993ed"
AZURE_AD_TENANT_ID="1c06ce7c-7884-4796-8652-d4c32d75a5d0"
6. Prisma Install
To get Prisma fully installed and ready to talk to your PostgreSQL database, you need to install the CLI (for migrations) and the Client (for your code to query the database).
Run these three commands in your terminal:
- Install the Prisma packages Bash
6.1. The CLI is for development tasks like migrations
npm install prisma --save-dev
##The Client is used by your Next.js code to talk to the DB
npm install @prisma/client
- Install the Dotenv helper Since you are keeping your DATABASE_URL in .env.local (and your password has special characters), you need this to bridge the gap between Next.js and the Prisma CLI:
npm install dotenv-cli --save-dev
- Initialize and Generate Once the packages are installed, you need to initialize the Prisma folder (if you haven't already) and generate the types for your FileNode model:
Bash
6.2. Create the prisma folder
npx prisma init
7. Run this whenever you change your schema.prisma file
npx dotenv -e .env.local -- npx prisma generate 4. Apply your Schema to PostgreSQL Finally, run this to actually create the tables in your webcalibre2 database:
npx dotenv -e .env.local -- npx prisma migrate dev --name init_database
7.1. Pro-Tip: Update your package.json
To avoid typing that long dotenv command every time, open your package.json and add this to the "scripts" section:
JSON
"scripts": { "db:migrate": "dotenv -e .env.local -- prisma migrate dev", "db:studio": "dotenv -e .env.local -- prisma studio" } Now, you can just run npm run db:migrate whenever you update your schema!
8. Where we are up to 8/1/2026
We can authenticate with MS Azure, upload a file and store it on my personal OneDrive. I can see a few problems,
-
if the file gets stored with its original filename, if I store the same file again it tells that it fail, but in reality it did not fail the it got renamed with 1.pdf added this is not added data base.
-
We may be better to create a folder and put the file in the folder, to me the logical name would id of the file, but that is automatically create and assigned when the data is stored as a UUID.
-
We would have to create the UUID ourselves, so that we can create a folder with that specific UUID and store the file in the folder.
-
The Upload file Page needs to be able to create folder as well select a parent , add a description of either the file
9. Testing Creating And Uploading Folders and Files
The functionality works may not the best user interface
Projects ID 0371fdfe-a2d1-4f25-b229-804f299bc064 Project-1 ID c8eebe0e-6e90-4cfb-8e44-c05f7064f3b1 parentID 0371fdfe-a2d1-4f25-b229-804f299bc064 AS-NZS3000-2018.pdf parentID c8eebe0e-6e90-4cfb-8e44-c05f7064f3b1
Now we will go now and add metadata